GPT Image 2 AI Art Prompt Guide:複数シーンでキャラクター一貫性を保つ方法
GPT Image 2 Team
2026年5月10日
GPT Image 2 AI artでキャラクターを複数シーンにわたって認識可能に保つための実践prompt guide。identity anchors、reference image workflow、prompt templates、評価手順、troubleshootingを扱います。

キャラクター一貫性は、prompt-to-art制作で最も難しい部分の1つです。単体の画像は印象的に作れても、ストーリー、ゲームピッチ、コンセプトデッキ、漫画ページ、キャラクターアートシリーズでは、もっと厳しい条件が必要です。カメラ角度、照明、衣装、感情の場面が変わっても、同じ人物として認識されなければなりません。
このガイドは、GPT Image 2系のworkflowでキャラクターアート、コンセプトアート、prompt-to-art制作、シーン単位のビジュアル開発を行うAI art creator向けです。完璧なidentity lockを約束するものではありません。現在のidentity-consistency研究と公式GPT Image guidanceは、どちらも同じ実務的な事実を示しています。一貫性はworkflowであり、魔法ではありません。強いpromptは役に立ちますが、promptだけでシステム全体にはなりません。
信頼できる方法は、プロセスを設計することです。character anchor、index化したreference images、layered prompts、小さなcontrolled edits、安定した出力設定、version records、そしてdriftがプロジェクト全体に広がる前に検出するreview methodが必要です。
Character Consistencyの本当の意味
AI art制作におけるcharacter consistencyは、全ピクセルが同一であることではありません。連続する画像を見た人が、同じキャラクターだと信じられることです。実務では、その認識はいくつかの安定したidentity cuesに依存します。
| Layer | 安定させるべきもの | 慎重に変えてよいもの |
|---|---|---|
| Identity | face geometry、age range、skin tone、ethnicity cues、hairline、hair length、hair texture、scars、tattoos、body proportions | expression、head turn、partial shadow、facial tension |
| Styling | clothing silhouette、core color palette、signature accessories、posture language | weather layers、damage、dirt、formal variants、seasonal outerwear |
| Scene | location、lighting、weather、camera、pose、composition、medium | scene changeとして明示されていれば、ほぼすべて |
よくある誤りは、すべてのdetailを同じ重みで扱うことです。実際は違います。face geometry、hairline、body proportion、core outfit silhouette、signature accessoriesがidentityを支えます。background、camera、lighting、pose、weatherはsceneを支えます。promptがこの2つのグループを同時に変えると、modelは優先順位を失い、character driftが始まります。
現実的な制作目標は、1人のキャラクターを5から50枚の画像にわたって信じられる程度に保ちつつ、pose、emotion、framing、light、weather、scene designのcontrolled variationを許すことです。prompt-only workflowが生体認証システムのように振る舞うとは期待しないでください。driftを減らし、修復しやすいrepeatable pipelineを作ります。
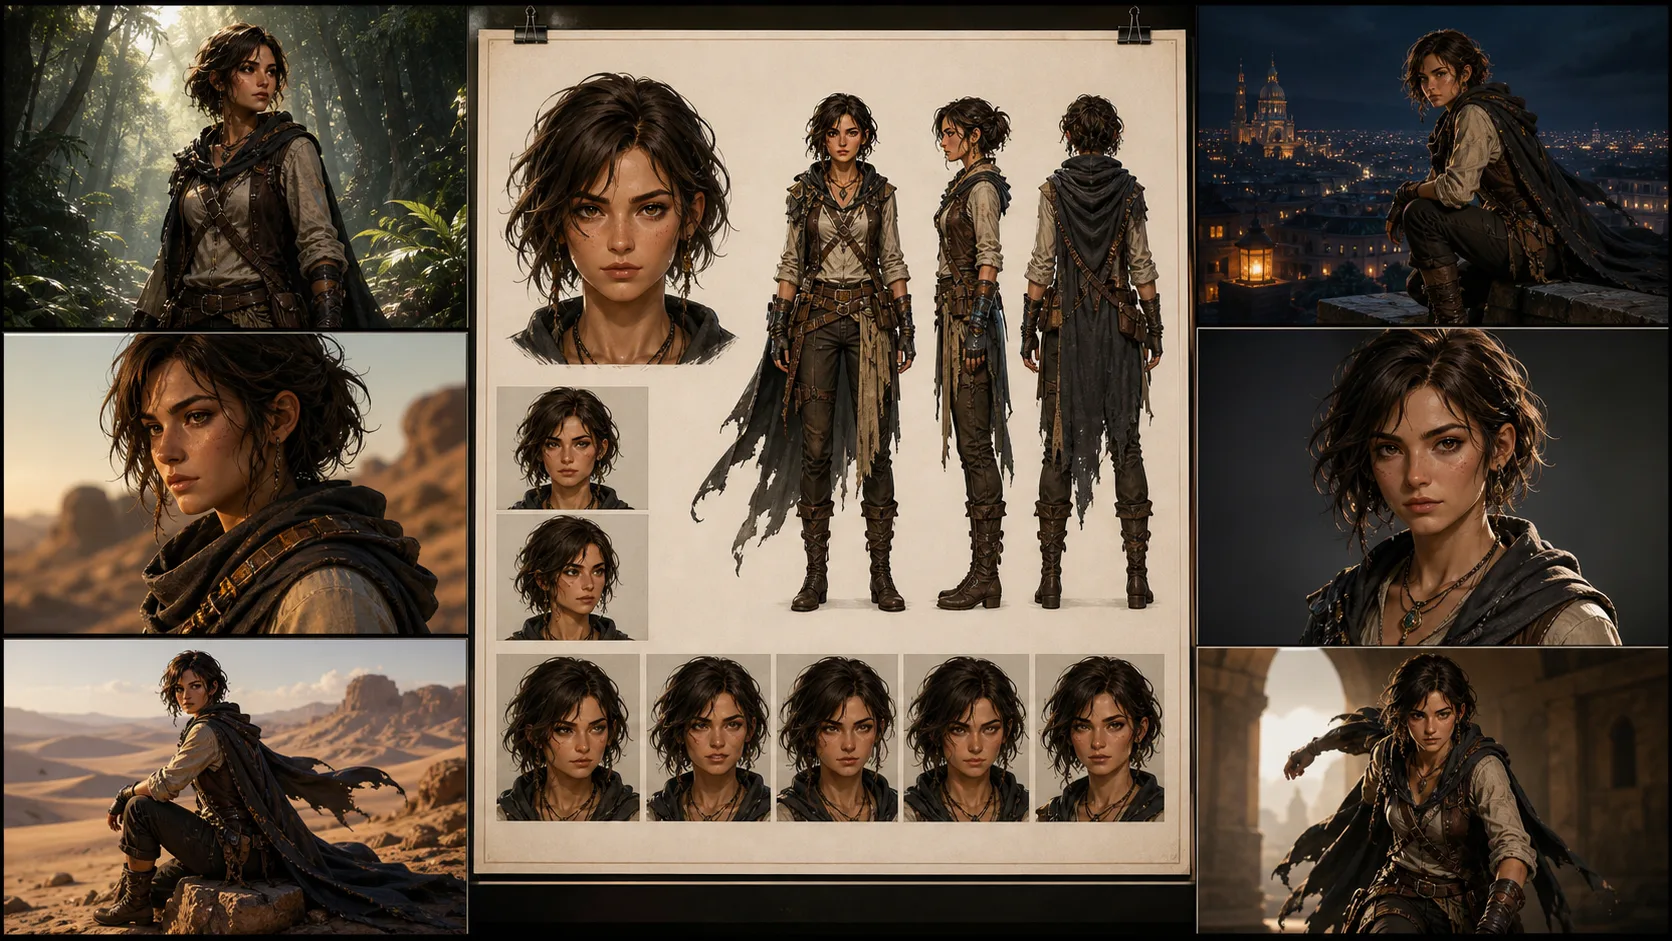
Character Bibleから始める
20シーンを頼む前に、character bibleを作ります。これはストーリーが複雑になる前にキャラクターを定義するreference setです。
最低限、有用なセットは4枚です。
- Front portrait。中立的な照明で顔が明確。
- Full-body standing pose。中立背景で服装全体が見える。
- Three-quarter view。髪型、鼻、顎、横顔の手がかりが分かる。
- Expression sheet。制御された感情変化で顔を確認できる。
制作では、ファイル名は素直に付けます。詩的な名前より退屈な命名規則の方が、revisionに耐えます。
CHAR_A/
  bible/
    CHAR_A_face_front_v01.png
    CHAR_A_fullbody_v01.png
    CHAR_A_threequarter_v01.png
    CHAR_A_expressions_v01.png
  outfits/
    CHAR_A_outfit_core_v01.png
    CHAR_A_outfit_winter_v02.png
  scenes/
    SCN_001_rooftop_dusk_v01.json
    SCN_014_rain_alley_low_angle_v03.json
character bibleは、cleanで、boringで、usefulであるべきです。anchor setでは、ドラマチックな照明、極端な角度、強いmotion blur、半分隠れた顔を避けます。それらは映画的に見えるかもしれませんが、referenceとしては弱いです。演技をさせる前に、modelにキャラクターを理解させます。
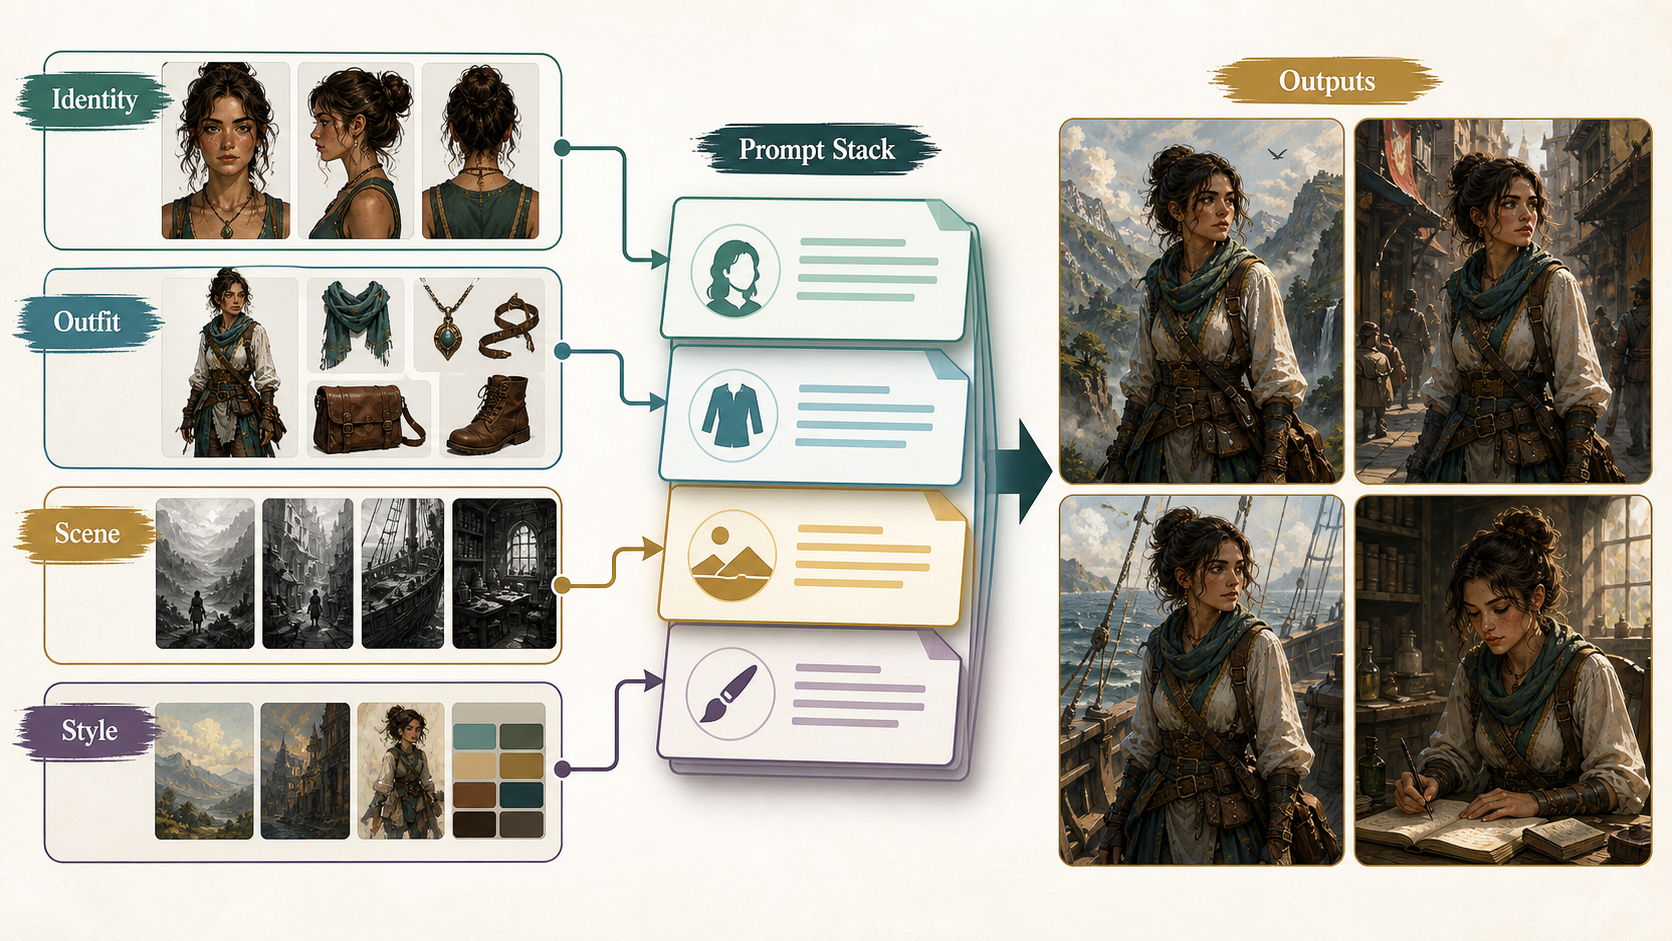
長いPrompt SoupではなくLayered Promptingを使う
長いpromptが自動的に良いわけではありません。多くの場合、競合する指示の山になります。保守しやすいpromptは、identity、styling、scene、camera、lighting、constraintsを分けます。
出発点としてこの構造を使います。
Task:
同じrecurring characterを含む新しいsceneを作成する。

Character anchor:
ID: <CHAR_ID>
Age range: <AGE_RANGE>
Skin tone and ethnicity cues: <SKIN_AND_ETHNICITY>
Face: <FACE_GEOMETRY>
Hair: <HAIRLINE_LENGTH_TEXTURE_PARTING>
Marks: <SCARS_TATTOOS_PLACEMENT>
Body proportions: <BODY_PROPORTIONS>
Core outfit: <OUTFIT_SILHOUETTE_COLORS>
Signature accessories: <ACCESSORIES>
Posture language: <POSTURE_LANGUAGE>

Scene:
<LOCATION_ACTION_STORY_BEAT>

Camera:
<SHOT_SIZE>, <ANGLE>, <FRAMING>, <LENS_FEEL>

Lighting:
<LIGHT_SOURCE>, <TIME_OF_DAY>, <WEATHER>, <COLOR_TEMPERATURE>

Style:
<ART_STYLE_OR_PHOTOREALISTIC_LOOK>

Preserve:
same identity, same face geometry, same hairline, same body proportions,
same core outfit silhouette, same signature accessories, same age range

Change only:
<CONTROLLED_SCENE_DELTA>

Exclude:
no extra characters, no extra jewelry, no text, no watermark, no logos,
do not change age, skin tone, ethnicity cues, or facial structure
これは派手ではありません。そこが重要です。modelに明確な階層を与え、シーンをまたいで再利用できるtemplateになります。失敗したときも、prompt全体を書き直すのではなく、blockごとに確認できます。
最重要指示:PreserveとChange
公式GPT Image guidanceでは、編集は何を変え、何を残すかを明確にした方がうまくいくとされています。character consistencyでは、これが最も有用な習慣です。
弱い指示:
Put the same woman in a snowy city at night.強い指示:
Change only the environment from a clear dusk rooftop to a snowy city street at night.
Keep the same character, same face geometry, same hairline, same body proportions,
same core outfit, same silver ear cuff, same camera angle, and same framing.
Only update the lighting, snowfall, wet pavement, and background architecture.
No extra text, no watermark, no logo.
2つ目は長いですが、肥大化しているわけではありません。各フレーズがよくあるfailure modeを狭めています。新しいface、outfit、cameraでsceneを解決しないようmodelに伝えています。
multi-scene workでは、すべてのpromptをcontrolled editとして扱います。新規生成でも、character anchorは保持し、このscene variableだけを変える、という書き方にします。
Reference Images:各画像に1つの役割を与える
Reference imagesはGPT Image 2 AI art prompt workflowで最も強いstabilizerです。ただし役割を定義しないと、reference images同士が衝突します。
indexed referencesを使います。
Reference image roles:
Image 1: face and hair identity anchor.
Image 2: full-body proportions and core outfit silhouette.
Image 3: style reference only, do not copy the person from Image 3.
Image 4: scene sketch or composition reference, optional.
その役割をprompt内でも繰り返します。
Use Image 1 only to preserve the character's face, hairline, and hair texture.
Use Image 2 to preserve body proportions, outfit silhouette, color palette, and accessories.
Use Image 3 only for brushwork, color mood, and rendering style.
Do not borrow identity, clothing, or facial details from Image 3.
Use Image 4 only for composition and camera placement.
これは重要です。style referenceに魅力的なキャラクターがいると、modelがその人物の顔を吸収することがあります。pose referenceの服が違えば、outfitがdriftします。cinematic referenceの影が強すぎると、face anchorが隠れます。Reference imagesも魔法ではありません。境界を持たせる必要があります。
最もcleanなworkflowでは、identity referenceはneutralに、outfit referenceはfull-bodyに、style referenceは可能なら人物なしに、composition referenceはsimpleにします。
小さなStepでSceneを作る
よくある失敗は、1回のgenerationで5つ以上の次元を変えることです。
- same character,
- new outfit,
- new pose,
- new camera angle,
- new lighting,
- new medium,
- new location.
identityが重要なら、これは要求が大きすぎます。作業を分けます。
- faceとfull-body anchorを固定する。
- target camera angleで同じcharacterを生成する。
- poseを変える。
- environmentを変える。
- weatherまたはlightingを加える。
- outerwearまたはcostume variantだけを変える。
- identityが安定してからstyleを変換する。
anime、水彩、comic inkなどのstylized outputでは特に重要です。Style transferはidentityを飲み込みやすいです。styleをまたぐときは、"same facial proportions"、"same hairstyle silhouette"、"same color palette"と明記し、"do not enlarge the eyes or make the character younger"のような制約も加えます。
5から50シーンのProduction Pipeline
実際のcharacter art seriesでは、すべてのsceneを先に生成して後でreviewしないでください。不一致画像の山になり、原因も分からなくなります。
このpipelineを使います。
| Stage | Output | Quality check |
|---|---|---|
| 1. Character definition | written identity sheet and anchor prompts | identity cues are specific, not vague |
| 2. Character bible | portrait, full body, three-quarter view, expression sheet | same person across all anchors |
| 3. Spec freeze | fixed model choice, size, quality, reference set, prompt template | future runs can be compared fairly |
| 4. Scene planning | one structured prompt per scene | each scene has one primary change |
| 5. Batch generation | 2 to 4 candidates per scene | reject obvious face and outfit drift early |
| 6. Targeted repair | edit only the failed element | preserve list repeated every time |
| 7. Final review | side-by-side anchor comparison | identity, outfit, and story beat pass together |
受け入れた画像ごとに記録を残します。
character_id
scene_id
model_or_snapshot
size
quality
prompt_version
final_prompt
revised_prompt_if_available
reference_image_ids_or_filenames
previous_response_or_image_id_if_used
accepted_output_filename
review_notes
これは事務作業に見えますが、混乱を防ぎます。scene 14が良く、scene 15でdriftしたなら、何が変わったのか知る必要があります。記録がなければ推測するしかありません。
応用できるPrompt Templates
Template 1:ゼロからCharacter Anchorを作る
Task:
recurring AI art series用のclean character anchorを作成する。

Character:
ID: CHAR_A
Age range: late 20s
Skin tone and ethnicity cues: warm medium skin tone, mixed East Asian and Latin features
Face: oval face, defined cheekbones, straight nose bridge, slightly sharp jawline
Hair: black shoulder-length wavy hair, center part, clean visible hairline
Marks: small diagonal scar at the outer end of the left eyebrow
Body: lean athletic build, medium height, narrow shoulders, long legs
Core outfit: cropped charcoal utility jacket, white ribbed shirt, high-waisted black cargo pants
Accessories: single silver ear cuff on left ear, thin black wristband
Palette: charcoal, black, white, muted teal accent
Posture: alert, grounded, slightly guarded

Scene:
plain warm gray studio background, full body visible, standing naturally

Camera:
full body, eye-level, centered, natural 50mm portrait feel

Lighting:
soft studio light, neutral color temperature, clear face visibility

Style:
high-detail character concept art, clean realistic rendering

Preserve:
same face geometry, same hairline, same body proportions, same outfit silhouette,
same scar, same silver ear cuff, same wristband

Exclude:
no extra characters, no text, no watermark, no logo, no dramatic shadow across the face
Template 2:Reference Images付きの新しいScene
Task:
同じrecurring characterで新しいsceneを作成する。

Reference image roles:
Image 1: face and hair identity anchor.
Image 2: full-body proportions and core outfit anchor.
Image 3: rainy neon color mood only, do not copy any person from Image 3.

Scene:
the character runs through a narrow neon alley during heavy rain,
wet pavement reflecting magenta and green signs

Camera:
wide full-body shot, low angle, dynamic motion, 24mm cinematic feel

Lighting:
neon reflections, sodium street light from the rear, cool rain haze

Style:
photorealistic cinematic concept art

Preserve:
same identity as Image 1, same face geometry, same hairline, same scar,
same body proportions from Image 2, same core outfit silhouette,
same silver ear cuff and wristband

Change only:
pose becomes running, jacket surface becomes wet, environment becomes rainy neon alley

Exclude:
no umbrella, no hat, no extra jewelry, no extra text, no watermark, no logo
Template 3:Identityを失わないStyle Conversion
Task:
既存のcharacter sceneをblack-and-white comic ink styleに変換する。

Preserve:
same character identity, same facial proportions, same hairstyle silhouette,
same scar location, same body proportions, same outfit silhouette,
same camera angle, same framing, same pose

Change only:
rendering medium changes to black-and-white comic ink,
with bold shadows, clean linework, and high contrast rain reflections

Exclude:
do not make the character younger, do not enlarge the eyes,
do not change hair length, do not remove the eyebrow scar,
no text, no watermark, no logo
Evaluation:雰囲気だけを信じない
人間のreviewは必要ですが、曖昧な好みだけでは足りません。小さなbenchmark setを作り、再利用します。
実用的なbenchmarkには次を含めます。
- front close-up,
- three-quarter face,
- full-body standing pose,
- seated pose,
- running action,
- low-angle hero shot,
- top-down scene,
- rainy night,
- snowy night,
- outfit overlay,
- strong emotion,
- style conversion.
各sceneで、同じreference setとtemplateを使って複数候補を生成します。候補は単独ではなくanchorの横でreviewします。
7項目のhuman rubricを使います。
| Question | Pass condition |
|---|---|
| Is it the same face? | major facial geometry and age range match |
| Is the age range stable? | the character is not made younger or older without intent |
| Are skin tone and ethnicity cues stable? | no accidental identity recast |
| Is the hairstyle stable? | hairline, length, texture, and silhouette remain recognizable |
| Are body proportions stable? | height, build, and limb proportions feel consistent |
| Is the core outfit stable? | silhouette, palette, and signature accessories survive |
| Did the scene task succeed? | the required action, setting, camera, and mood are present |
自動チェックを使う場合は、補助として扱い、最終判断にしないでください。Face embeddings、perceptual similarity tools、vision-language scoringは外れ値検出に役立ちますが、stylized rendering、occlusion、profile views、heavy lighting changesでは失敗することがあります。最後の問いは視覚的です。readerやart directorが同じキャラクターだと信じるかどうかです。
よくあるDrift問題のTroubleshooting
| Problem | What it looks like | Fastest fix |
|---|---|---|
| Face drift | eyes、jaw、nose、hairlineが合わなくなる | face referenceを使い、preserve listを繰り返し、scene changeを減らす |
| Outfit drift | jacket、colors、accessories、silhouetteが変わる | full-body outfit referenceを追加し、core outfitとouterwearを分ける |
| Style eats identity | animeやwatercolor版が別人になる | same facial proportionsとsame hairstyle silhouetteを指定し、identityが安定してからstyle変換 |
| Camera drift | angle、crop、perspectiveが予期せず変わる | camera blockとpreserve listにshot size、angle、framing、lens feelを書く |
| Local edit spillover | earrings修正でhairやfaceまで変わる | editを狭め、可能ならmaskを使い、"change only"指示を繰り返す |
| Over-copying reference | faceが貼り付けたように硬い | 複数角度を使い、identityを保ちながらexpressionとlightingの違いを許す |
| Text and logos appear | random letters、watermark風の跡、fake branding | すべてのproduction promptに"no text, no watermark, no logo"を入れる |
ほとんどの失敗は、一度に変えすぎることから来ます。迷ったら簡略化してください。よりcleanな中間版を生成し、そこからcontrolled editを1つ行います。
Practical Settings Advice
プロジェクト内では設定を安定させます。model version、image size、quality level、reference set、prompt structureを同時に変えると、どの変数がdriftを起こしたのか分かりません。
character artでは、anchorにportraitまたはsquare formatを使います。landscapeはscene上必要な場合だけにします。最終export sizeとidentity testingは分けて考えます。大きい、または実験的なoutput sizeは納品に有用でも、一貫性reviewのbaselineには向きません。
draftでは複数候補を生成します。approved finalsではvariationを減らし、正確なpromptとreferencesを記録します。workflowがrevised promptやcontinuation IDを出すなら保存します。production consistencyはpromptと同じくらい記録に依存します。
また、使用しているGPT Image 2 image interfaceで公開されていないcontrolsをworkflowの前提にしないでください。seed、sampling steps、guidance scaleが露出していないなら、それらをrepeatability systemの一部として扱ってはいけません。実際に使えるcontrols、つまりreferences、prompt structure、edits、利用可能なimage IDsまたはprevious responses、stable size、stable quality、careful reviewを使います。
Final Takeaway
character consistencyのための最良のGPT Image 2 AI art prompt guideは、秘密のpromptではありません。disciplineのあるworkflowです。
- storyの前にcharacterを定義する。
- identityとscene changeを分ける。
- 各reference imageに1つの仕事を与える。
- small editsを行う。
- 変えるものより保つものを多く指定する。
- accepted runをすべて記録する。
- anchorsと比較してreviewする。
- driftをすぐ修復する。
これによりprompt-to-art実験を、使えるcharacter art、concept art、comic development、production-ready scene sequencesへ変えられます。一貫性は実現できますが、管理しなければなりません。