GPT Image 2 AI Art Prompt Guide: 여러 장면에서 캐릭터 일관성 유지하기
GPT Image 2 Team
2026년 5월 10일
GPT Image 2 AI art에서 캐릭터를 여러 장면에 걸쳐 알아볼 수 있게 유지하기 위한 실무 prompt guide. identity anchors, reference image workflows, prompt templates, evaluation steps, troubleshooting을 다룹니다.

캐릭터 일관성은 prompt-to-art 제작에서 가장 어려운 부분 중 하나입니다. 한 장의 이미지는 멋져 보일 수 있지만, 스토리, 게임 피치, 콘셉트 덱, 만화 페이지, 캐릭터 아트 시리즈에는 더 엄격한 조건이 필요합니다. 카메라 각도, 조명, 의상, 감정 장면이 바뀌어도 같은 사람으로 인식되어야 합니다.
이 가이드는 캐릭터 아트, 콘셉트 아트, prompt-to-art 제작, 장면별 비주얼 개발에 GPT Image 2 스타일 workflow를 사용하는 AI art creator를 위해 작성되었습니다. 완벽한 identity lock을 약속하지 않습니다. 현재 identity-consistency 연구와 공식 GPT Image guidance는 같은 실무적 사실을 가리킵니다. 일관성은 마법이 아니라 workflow입니다. 더 강한 prompt는 도움이 되지만, prompt 하나만으로 전체 시스템이 되지는 않습니다.
신뢰할 수 있는 접근은 프로세스를 설계하는 것입니다. character anchor, 인덱싱된 reference images, layered prompts, 작은 controlled edits, 안정적인 출력 설정, version records, 그리고 drift가 전체 프로젝트로 퍼지기 전에 잡아내는 review method가 필요합니다.
Character Consistency가 실제로 의미하는 것
AI art 제작에서 character consistency는 모든 픽셀이 동일하다는 뜻이 아닙니다. 보는 사람이 여러 이미지가 같은 캐릭터를 보여 준다고 믿는다는 뜻입니다. 실무에서는 그 인식이 몇 가지 안정적인 identity cues에 달려 있습니다.
| Layer | 안정적으로 유지해야 할 것 | 신중하게 바꿀 수 있는 것 |
|---|---|---|
| Identity | face geometry, age range, skin tone, ethnicity cues, hairline, hair length, hair texture, scars, tattoos, body proportions | expression, head turn, partial shadow, facial tension |
| Styling | clothing silhouette, core color palette, signature accessories, posture language | weather layers, damage, dirt, formal variants, seasonal outerwear |
| Scene | location, lighting, weather, camera, pose, composition, medium | scene change로 명시되어 있다면 거의 전부 |
실수는 모든 detail을 같은 중요도로 보는 것입니다. 그렇지 않습니다. face geometry, hairline, body proportion, core outfit silhouette, signature accessories는 identity를 담당합니다. background, camera, lighting, pose, weather는 scene을 담당합니다. prompt가 두 그룹을 동시에 바꾸면 model은 우선순위를 잃고 캐릭터가 drift하기 시작합니다.
좋은 제작 목표는 현실적이어야 합니다. 한 캐릭터를 5~50장의 이미지에서 믿을 수 있게 유지하면서 pose, emotion, framing, light, weather, scene design의 controlled variation을 허용하는 것입니다. prompt-only workflow가 생체 인식 시스템처럼 작동할 것이라 기대하지 마십시오. 대신 drift를 줄이고 고치기 쉬운 repeatable pipeline을 만드십시오.
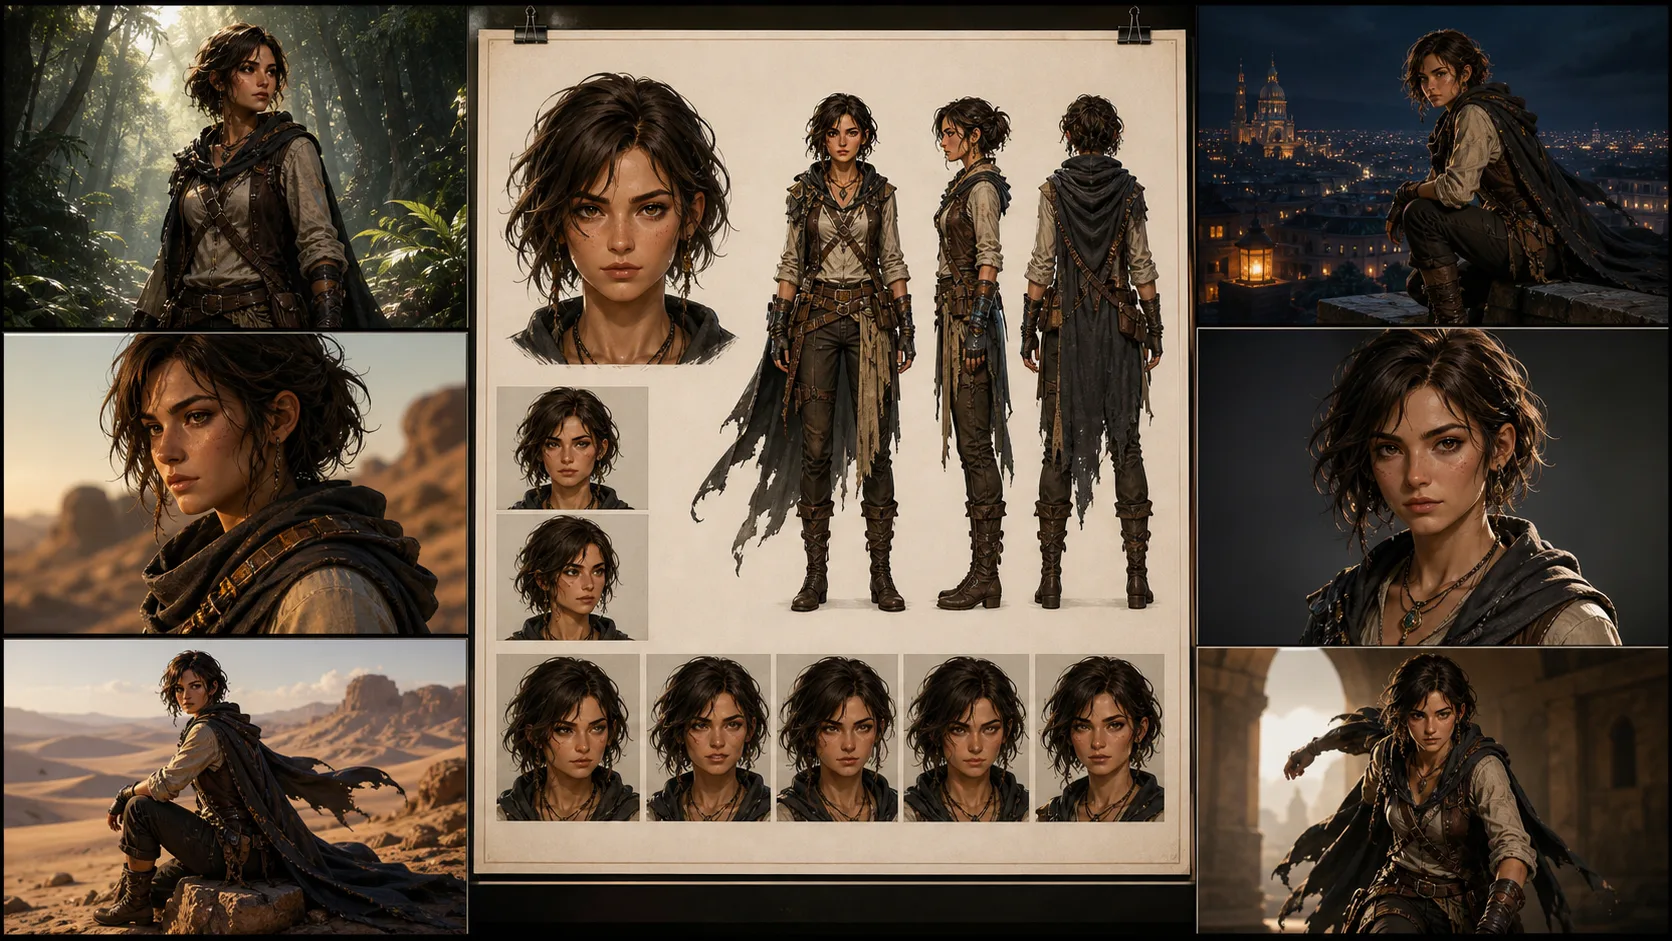
Character Bible부터 시작하기
스무 개 장면을 요청하기 전에 character bible을 만드십시오. 이것은 스토리가 복잡해지기 전에 캐릭터를 정의하는 reference set입니다.
유용한 최소 세트는 네 장입니다.
- Front portrait, 중립 조명, 얼굴이 명확함.
- Full-body standing pose, 중립 배경, 전체 의상.
- Three-quarter view, 머리 모양, 코, 턱, 프로필 단서가 보임.
- Expression sheet, 통제된 감정 변화에서 얼굴을 보여 줌.
제작에서는 파일 이름을 단순하게 붙이십시오. 시적인 이름보다 지루한 명명 시스템이 revision을 견딥니다.
CHAR_A/
  bible/
    CHAR_A_face_front_v01.png
    CHAR_A_fullbody_v01.png
    CHAR_A_threequarter_v01.png
    CHAR_A_expressions_v01.png
  outfits/
    CHAR_A_outfit_core_v01.png
    CHAR_A_outfit_winter_v02.png
  scenes/
    SCN_001_rooftop_dusk_v01.json
    SCN_014_rain_alley_low_angle_v03.json
character bible은 clean, boring, useful해야 합니다. anchor set에는 극적인 조명, 극단적인 각도, 심한 motion blur, 반쯤 가려진 얼굴을 피하십시오. 그런 선택은 영화적으로 보일 수 있지만 reference로는 약합니다. 캐릭터가 연기하기 전에 model이 캐릭터를 이해해야 합니다.
긴 Prompt Soup 대신 Layered Prompting 사용하기
긴 prompt가 자동으로 더 좋은 것은 아닙니다. 대개 서로 경쟁하는 지시의 더미가 됩니다. 유지보수 가능한 prompt는 identity, styling, scene, camera, lighting, constraints를 분리해야 합니다.
출발점으로 이 구조를 사용하십시오.
Task:
같은 recurring character가 등장하는 새 scene을 만든다.

Character anchor:
ID: <CHAR_ID>
Age range: <AGE_RANGE>
Skin tone and ethnicity cues: <SKIN_AND_ETHNICITY>
Face: <FACE_GEOMETRY>
Hair: <HAIRLINE_LENGTH_TEXTURE_PARTING>
Marks: <SCARS_TATTOOS_PLACEMENT>
Body proportions: <BODY_PROPORTIONS>
Core outfit: <OUTFIT_SILHOUETTE_COLORS>
Signature accessories: <ACCESSORIES>
Posture language: <POSTURE_LANGUAGE>

Scene:
<LOCATION_ACTION_STORY_BEAT>

Camera:
<SHOT_SIZE>, <ANGLE>, <FRAMING>, <LENS_FEEL>

Lighting:
<LIGHT_SOURCE>, <TIME_OF_DAY>, <WEATHER>, <COLOR_TEMPERATURE>

Style:
<ART_STYLE_OR_PHOTOREALISTIC_LOOK>

Preserve:
same identity, same face geometry, same hairline, same body proportions,
same core outfit silhouette, same signature accessories, same age range

Change only:
<CONTROLLED_SCENE_DELTA>

Exclude:
no extra characters, no extra jewelry, no text, no watermark, no logos,
do not change age, skin tone, ethnicity cues, or facial structure
이것은 화려하지 않습니다. 그게 핵심입니다. model에 명확한 계층을 주고, 여러 장면에서 재사용할 수 있는 template을 줍니다. 장면이 실패하면 전체 prompt를 처음부터 다시 쓰는 대신 block 하나씩 점검할 수 있습니다.
가장 중요한 지시: Preserve와 Change
공식 GPT Image guidance에 따르면 edit은 무엇을 바꾸고 무엇을 유지할지 명확히 말할 때 가장 잘 작동합니다. 캐릭터 일관성에서는 이것이 가장 유용한 습관입니다.
약한 지시:
Put the same woman in a snowy city at night.더 강한 지시:
Change only the environment from a clear dusk rooftop to a snowy city street at night.
Keep the same character, same face geometry, same hairline, same body proportions,
same core outfit, same silver ear cuff, same camera angle, and same framing.
Only update the lighting, snowfall, wet pavement, and background architecture.
No extra text, no watermark, no logo.
두 번째는 더 길지만 비대하지 않습니다. 각 문구가 흔한 failure mode를 좁힙니다. model이 새 얼굴, 새 의상, 새 카메라로 장면 문제를 해결하지 않도록 말해 줍니다.
multi-scene work에서는 모든 prompt를 controlled edit으로 다루십시오. 새 이미지를 생성하더라도 character anchor는 보존하고 이 scene variable만 바꾼다고 쓰십시오.
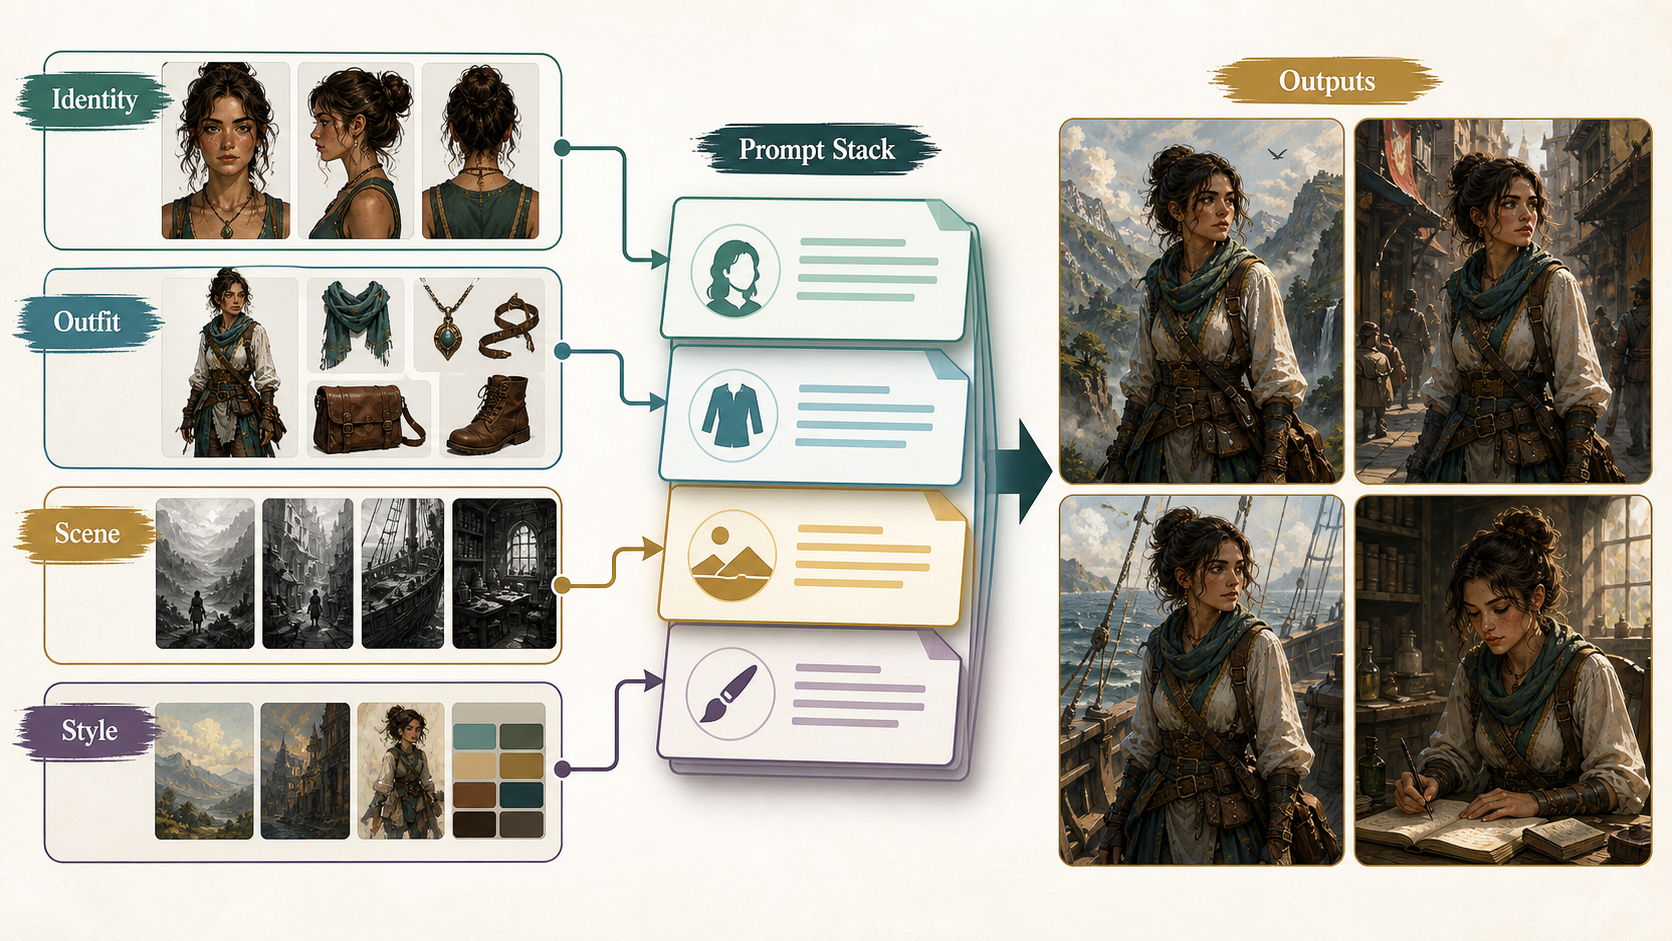
Reference Images: 각 이미지에 하나의 역할 주기
Reference images는 GPT Image 2 AI art prompt workflow에서 가장 강한 stabilizer입니다. 하지만 역할을 정하지 않으면 reference images가 서로 충돌할 수 있습니다.
indexed references를 사용하십시오.
Reference image roles:
Image 1: face and hair identity anchor.
Image 2: full-body proportions and core outfit silhouette.
Image 3: style reference only, do not copy the person from Image 3.
Image 4: scene sketch or composition reference, optional.
그 역할을 prompt 안에서 반복하십시오.
Use Image 1 only to preserve the character's face, hairline, and hair texture.
Use Image 2 to preserve body proportions, outfit silhouette, color palette, and accessories.
Use Image 3 only for brushwork, color mood, and rendering style.
Do not borrow identity, clothing, or facial details from Image 3.
Use Image 4 only for composition and camera placement.
이것은 중요합니다. style reference에 아름다운 캐릭터가 있으면 model이 그 사람의 얼굴을 흡수할 수 있습니다. pose reference의 의상이 다르면 outfit이 drift할 수 있습니다. cinematic reference의 그림자가 강하면 face anchor가 가려질 수 있습니다. Reference images도 마법이 아닙니다. 경계가 필요한 입력입니다.
가장 clean한 workflow는 identity reference를 중립적으로, outfit reference를 full-body로, style reference는 가능하면 인물 없이, composition reference는 단순하게 유지하는 것입니다.
작은 단계로 Scene 만들기
흔한 실패 패턴은 한 번의 generation에서 너무 많은 차원을 바꾸는 것입니다.
- same character,
- new outfit,
- new pose,
- new camera angle,
- new lighting,
- new medium,
- new location.
identity가 중요하다면 요구가 너무 큽니다. 작업을 단계로 나누십시오.
- face와 full-body anchor를 고정한다.
- target camera angle에서 같은 캐릭터를 생성한다.
- pose를 바꾼다.
- environment를 바꾼다.
- weather나 lighting을 추가한다.
- outerwear 또는 costume variant만 바꾼다.
- identity가 안정된 뒤에 style을 변환한다.
anime, watercolor, comic ink 같은 stylized output에서는 특히 중요합니다. Style transfer는 identity를 쉽게 삼킬 수 있습니다. style을 넘나들 때는 "same facial proportions", "same hairstyle silhouette", "same color palette"를 명시하고 "do not enlarge the eyes or make the character younger" 같은 제약을 추가하십시오.
5~50개 Scene을 위한 Production Pipeline
실제 character art series에서는 모든 scene을 먼저 생성하고 나중에 review하지 마십시오. 그러면 불일치 이미지 더미와 불명확한 원인만 남습니다.
이 pipeline을 사용하십시오.
| Stage | Output | Quality check |
|---|---|---|
| 1. Character definition | written identity sheet and anchor prompts | identity cues are specific, not vague |
| 2. Character bible | portrait, full body, three-quarter view, expression sheet | same person across all anchors |
| 3. Spec freeze | fixed model choice, size, quality, reference set, prompt template | future runs can be compared fairly |
| 4. Scene planning | one structured prompt per scene | each scene has one primary change |
| 5. Batch generation | 2 to 4 candidates per scene | reject obvious face and outfit drift early |
| 6. Targeted repair | edit only the failed element | preserve list repeated every time |
| 7. Final review | side-by-side anchor comparison | identity, outfit, and story beat pass together |
승인한 모든 이미지에 대해 기록을 남기십시오.
character_id
scene_id
model_or_snapshot
size
quality
prompt_version
final_prompt
revised_prompt_if_available
reference_image_ids_or_filenames
previous_response_or_image_id_if_used
accepted_output_filename
review_notes
행정 작업처럼 보이지만 혼란을 막습니다. scene 14는 좋고 scene 15가 drift한다면 무엇이 바뀌었는지 알아야 합니다. 기록이 없으면 추측할 수밖에 없습니다.
응용 가능한 Prompt Templates
Template 1: 처음부터 Character Anchor 만들기
Task:
recurring AI art series를 위한 clean character anchor를 만든다.

Character:
ID: CHAR_A
Age range: late 20s
Skin tone and ethnicity cues: warm medium skin tone, mixed East Asian and Latin features
Face: oval face, defined cheekbones, straight nose bridge, slightly sharp jawline
Hair: black shoulder-length wavy hair, center part, clean visible hairline
Marks: small diagonal scar at the outer end of the left eyebrow
Body: lean athletic build, medium height, narrow shoulders, long legs
Core outfit: cropped charcoal utility jacket, white ribbed shirt, high-waisted black cargo pants
Accessories: single silver ear cuff on left ear, thin black wristband
Palette: charcoal, black, white, muted teal accent
Posture: alert, grounded, slightly guarded

Scene:
plain warm gray studio background, full body visible, standing naturally

Camera:
full body, eye-level, centered, natural 50mm portrait feel

Lighting:
soft studio light, neutral color temperature, clear face visibility

Style:
high-detail character concept art, clean realistic rendering

Preserve:
same face geometry, same hairline, same body proportions, same outfit silhouette,
same scar, same silver ear cuff, same wristband

Exclude:
no extra characters, no text, no watermark, no logo, no dramatic shadow across the face
Template 2: Reference Images가 있는 새 Scene
Task:
같은 recurring character로 새 scene을 만든다.

Reference image roles:
Image 1: face and hair identity anchor.
Image 2: full-body proportions and core outfit anchor.
Image 3: rainy neon color mood only, do not copy any person from Image 3.

Scene:
the character runs through a narrow neon alley during heavy rain,
wet pavement reflecting magenta and green signs

Camera:
wide full-body shot, low angle, dynamic motion, 24mm cinematic feel

Lighting:
neon reflections, sodium street light from the rear, cool rain haze

Style:
photorealistic cinematic concept art

Preserve:
same identity as Image 1, same face geometry, same hairline, same scar,
same body proportions from Image 2, same core outfit silhouette,
same silver ear cuff and wristband

Change only:
pose becomes running, jacket surface becomes wet, environment becomes rainy neon alley

Exclude:
no umbrella, no hat, no extra jewelry, no extra text, no watermark, no logo
Template 3: Identity를 잃지 않는 Style Conversion
Task:
기존 character scene을 black-and-white comic ink style로 변환한다.

Preserve:
same character identity, same facial proportions, same hairstyle silhouette,
same scar location, same body proportions, same outfit silhouette,
same camera angle, same framing, same pose

Change only:
rendering medium changes to black-and-white comic ink,
with bold shadows, clean linework, and high contrast rain reflections

Exclude:
do not make the character younger, do not enlarge the eyes,
do not change hair length, do not remove the eyebrow scar,
no text, no watermark, no logo
Evaluation: 느낌만 믿지 말 것
사람의 review는 필요하지만 막연한 취향만으로는 부족합니다. 작은 benchmark set을 만들고 반복해서 사용하십시오.
실용적인 benchmark에는 다음이 포함됩니다.
- front close-up,
- three-quarter face,
- full-body standing pose,
- seated pose,
- running action,
- low-angle hero shot,
- top-down scene,
- rainy night,
- snowy night,
- outfit overlay,
- strong emotion,
- style conversion.
각 scene에서 같은 reference set과 template으로 여러 candidate를 생성하십시오. candidate는 단독으로 보지 말고 anchor 옆에서 review하십시오.
7점 human rubric을 사용하십시오.
| Question | Pass condition |
|---|---|
| Is it the same face? | major facial geometry and age range match |
| Is the age range stable? | the character is not made younger or older without intent |
| Are skin tone and ethnicity cues stable? | no accidental identity recast |
| Is the hairstyle stable? | hairline, length, texture, and silhouette remain recognizable |
| Are body proportions stable? | height, build, and limb proportions feel consistent |
| Is the core outfit stable? | silhouette, palette, and signature accessories survive |
| Did the scene task succeed? | the required action, setting, camera, and mood are present |
자동 검사를 쓴다면 보조 수단으로만 취급하십시오. Face embeddings, perceptual similarity tools, vision-language scoring은 outlier를 찾는 데 도움이 될 수 있지만 stylized rendering, occlusion, profile views, heavy lighting changes에서는 실패할 수 있습니다. 최종 질문은 여전히 시각적입니다. 독자나 art director가 이것을 같은 캐릭터라고 믿을 것인가입니다.
흔한 Drift 문제 Troubleshooting
| Problem | What it looks like | Fastest fix |
|---|---|---|
| Face drift | eyes, jaw, nose, hairline이 더 이상 맞지 않음 | face reference를 사용하고 preserve list를 반복하며 scene change를 줄임 |
| Outfit drift | jacket, colors, accessories, silhouette가 바뀜 | full-body outfit reference를 추가하고 core outfit과 outerwear를 분리함 |
| Style eats identity | anime나 watercolor 버전이 다른 사람처럼 변함 | same facial proportions와 same hairstyle silhouette를 지정하고 identity 안정 후 style 변환 |
| Camera drift | angle, crop, perspective가 예상과 다르게 변함 | camera block과 preserve list에 shot size, angle, framing, lens feel을 넣음 |
| Local edit spillover | earrings를 고치려다 hair나 face가 바뀜 | edit 범위를 좁히고 가능하면 mask를 쓰며 "change only" 지시를 반복함 |
| Over-copying reference | face가 붙여 넣은 듯하거나 뻣뻣함 | 여러 각도를 쓰고 identity를 보존하면서 expression과 lighting 변화는 허용함 |
| Text and logos appear | random letters, watermark 같은 흔적, fake branding | 모든 production prompt에 "no text, no watermark, no logo"를 유지함 |
대부분의 실패는 한 번에 너무 많은 변화를 요구하는 데서 옵니다. 확신이 없으면 단순화하십시오. 더 clean한 중간 버전을 생성한 뒤 controlled edit 하나를 수행하십시오.
Practical Settings Advice
프로젝트에서는 안정적인 설정을 사용하십시오. model version, image size, quality level, reference set, prompt structure를 동시에 바꾸면 어떤 변수가 drift를 일으켰는지 알 수 없습니다.
character art에서는 anchor에 portrait 또는 square format을 사용하십시오. landscape는 scene이 필요할 때만 사용합니다. final export size와 identity testing은 분리해서 보십시오. 매우 크거나 실험적인 output size는 납품에는 유용할 수 있지만 consistency review의 기준으로는 좋지 않습니다.
draft에서는 여러 candidate를 생성하십시오. approved finals에서는 variation을 줄이고 정확한 prompt와 references를 기록하십시오. workflow가 revised prompt나 continuation ID를 제공한다면 저장하십시오. production consistency는 prompt만큼 records에 의존합니다.
또한 사용 중인 GPT Image 2 image interface에서 공개적으로 지정되지 않은 controls에 workflow를 세우지 마십시오. seed, sampling steps, guidance scale이 노출되지 않았다면 repeatability system의 일부인 척하지 마십시오. 실제로 가진 controls를 사용하십시오: references, prompt structure, edits, 사용 가능한 경우 image IDs 또는 previous responses, stable size, stable quality, careful review.
Final Takeaway
character consistency를 위한 최고의 GPT Image 2 AI art prompt guide는 하나의 비밀 prompt가 아닙니다. 규율 있는 workflow입니다.
- story 전에 character를 정의한다.
- identity와 scene change를 분리한다.
- 각 reference image에 하나의 일만 준다.
- small edits를 한다.
- 바꾸는 것보다 보존할 것을 더 많이 명시한다.
- 승인된 모든 run을 기록한다.
- anchors와 비교해 review한다.
- drift를 즉시 repair한다.
이렇게 해야 prompt-to-art 실험이 usable character art, concept art, comic development, production-ready scene sequences로 바뀝니다. 일관성은 가능하지만 관리되어야 합니다.